About Me

My photo
Back in my hometown of Jonesboro., Arkansas, United States
My name is Dimitri Harris and I have been building frames for over 9 years now. I learned the basics after spending two weeks with Koichi Yamaguchi. He is one of the most interesting people I have ever met and I am thankful to have worked with him. Since then I have just been building one frame after another and learning as much as possible along the way. I build steel fillet-brazed frames that go by the name of MEECH, which is an old nickname that I have had since I was a kid. I build mostly cyclocross frames because I love their versatility however I also do road,single-speed, and mountain bikes as well. Custom frames start around $1400. All the frames are handmade by me here in Jonesboro, Arkansas. I am insured and guarantee all of my work so if you are in the market for a custom steel frame I would be glad to build it for you. I am also building frames from carbon fiber so if you would like to ride a prototype frame give me a shout. Thanks for stopping by. You can email me at meech151@hotmail.com or call (870)897-6703 or visit www.meechcustombicycles.com Thanks.

Friday, November 29, 2013

Kettle Cycles-SiCCC Carbon Brake Rotors

Just spotted this photo on a friend's facebook post.  I haven't read anything about them and have no idea how good it works. I do know that it looks killer.  You can find more info at Kettle Cycles.com website and I believe the rotor is called the SiCCC.  Check it out.

Wednesday, November 27, 2013

Fillets are Made

Yesterday was pretty cold out in the shop but it didn't seem to bother me too bad.  I have a new heater sitting out there but I need to get a 240 volt wire run for it to operate.  The cold didn't effect me so much but epoxy cures super-slow in the cold, especially when its slow-cure to begin with.  I got the brake bridge in place and started mixing up my fillet material.  Its just West Systems epoxy and then some filler additives made by them to increase the thickness and workability.  Just add it to the epoxy until it gets as thick as you want and you're good to go.  I mixed it up to about the consistency of mayonnaise so it didn't sag or run at all.

Here is the first juncture I did.  Its not real pretty right now but later after it hardened a bit I went out there and smoothed it out quite a bit.  Today I hope its cured enough to sand down and smooth out.  One thing I realized yesterday is that I truly enjoy making fillets.  It doesn't matter if its brass brazing or epoxy I really seem to enjoy it.  Don't know why.

I got better with each one. I'm sure I don't have to tell you this but this stuff can get messy real quick.  Somehow I managed to not get any on me but it takes a lot of focus.  Its about like working with that roofing tar.  Oddly enough I actually got up on the roof a couple of weeks ago and did make a big mess.  Then as soon as I got down the rain came.

I beefed these joints up quite a bit.  Lots will be sanded off but it also provides a little rigidity and adds a little contact surface area for the laminate to bond to.

I was getting good about this time.  I was happy with these, they should clean up nice.

Here is everything I used to make this mess.  The 406 is a white, powdery stuff that apparently has some strength to it.  The 423 is just graphite powder.  I basically just used it to make it black.  A little of this stuff goes a long way.  This Thanksgiving if someone complains about the turkey tasting funny you might not want to mention that you used your wife's great grandmother's gravy bowl thats been handed down through 3 generations to mix up your epoxy.  Hey, I covered it in foil.  Thats her scale also, luckily its unscathed.

I threw the frame on the alignment table before doing the fillets and the seat tube and head tube are perfectly level.  I also checked them with a height gauge to make sure everything was good.


The down tube and top tube were off just a hair.  Not sure why, maybe its because the whole front end fell off the other day before the epoxy had cured.  "Ya think?"  I'm truly not sure why, however steel frames usually don't come out of the jig completely straight either but you can straighten them.  You can't really straighten carbon I don't think, at least I don't know how yet.  I did put the frame back in the jig before applying the fillet material so who knows, maybe after all that epoxy dries it will pull it back into place.  The down tube and top tube rise about 2-3 millimeters from the bottom bracket/seat tube area to the head tube which is roughly about 600 millimeters in length, its not something you can see with your eye.  Some of you may remember me talking about throwing my Scott CR 1 on the table years ago. It was off by about 4 millimeters so I don't think there is a need to worry here, although we're all striving for perfection.

Yep, its here.  Last night I went over to Bob's shop and watched him finish my mandrel out on his lathe.  Kinda looks like a flashlight here doesn't it?  Anyway its sweet and I can't wait to try it out.  I think I may play with it on Turkey Day.  Anne and I are staying home this year with the boys (Smokey, Louis, Pinky, and Dizzy) as we didn't have enough time off to visit anyone.  Personally I don't mind, I hate traveling on the holidays.  I'm kind of a stay at home guy.  

I hope you guys have a good holiday.  If you travel, keep it safe.  Thanks for stopping by.

Sunday, November 24, 2013

Gravel Road Racer For Sale

Hey, if anyone is interested I have one last frame from this year that I'm looking to sell. I've posted pics of it a couple of months ago after I finished painting it.  Its a road frameset built to accommodate larger tires and longer pull brake calipers, medium reach calipers will work perfect.  This frame was kinda built around a pair of Pauls Racer Medium brake calipers.  Anyway, 28-30c tires are no problem and I've actually fit some Vittoria randonneur 32c tires between the stays also.  They were pretty snug but worked just fine.  This frame has internal brake cable routing that runs through the top tube and out the back of the seat tube.  It also has an integrated seatpost design.  The seatpost comes with it and I can have it machined to fit your exact saddle height.  I left it long so I have plenty of room to work with it.  The colors are Toxic Orange, a.k.a. Mango Tango and white.  The size is a 55/56 cm frame and the specs are as follow:

Head Tube Length               160mm
Head Tube Angle              73 degrees
Seat Tube Angle            73 degrees
Top Tube           55cm (actual  c-c)   56cm (effective c-c)  
Seat Tube 53cm (actual c-c)   55cm (effective c-c)
Bottom Bracket Drop is either 65 mm or 70 mm
Seat Post is 27.2 mm
Steerer   1 1/8" steel fork


Right now as is the measurement from the center of the bottom bracket to the seat rails is 
75 cm.  That is probably gonna put your seat height around 80 cm depending on the type saddle you run so I imagine it will have to be cut down for anyone who rides this size frame.  You can send me the measurement and I can have it machined down to fit or if you know a good machinist to do it for you thats another option.

Carbon chainstay protector.  Real carbon, handmade to fit these beefy chainstays.

Exit door for the rear brake housing.


Handmade right here in beautiful Mountain Home, Arkansas.  Come ride with me.

The bike will fly.

Thanks for checking it out.  If you have any questions you can give me a shout.  

(897-6703)

I'm asking $1250 for it but you guys know I love to give some good deals so don't be afraid to let me know your budget.  Thanks!

Saturday, November 23, 2013

Carbon Progress

I got the frame tacked on Thursday so its now a bicycle frame for the most part but I still have a lot of work to do but luckily its the fun part, I think.  Thursday night I about fell out on the floor.  The rear end was bonded and I checked it for straightness and it was spot on so Thursday afternoon I put the down and top tubes in place with a little 3M DP420.  I went to check it out about 3 hrs. later and everything looked pretty solid, the epoxy seemed dry to the touch, so I took the frame out of the jig to throw on the alignment table and check to see how straight it was and to also hang it on the scale just to see where I was at.  So as I'm tightening down the lock nut on the bottom bracket shell holder with the frame parallel to the table the whole front triangle started slowly getting closer to the steel surface.  
"What the ....?"  Anyway, it wasn't as solid as I thought so I immediately threw it back in the jig and beefed up the epoxy a bit more and let it cure overnight.  "There, thats better."  Standing around trying to pass the time while epoxy is drying is not exactly like steel frame building as I'm always a bit eager to move on to the next stepbut all is well up to this point.

I threw a wheel in the frame to make sure everything is aligned and its spot on although this photo here appears to be leaning. Actually the frame isn't sitting perpendicular in the stand. Anybody who has spent much time on this blog at all knows my photography is less than stellar.  For some reason little things like this leaning photo bother me, sometimes to the point that I will go take more pictures in order to correct it but this time I'm not gonna worry about it.

This photo shows how little space I have between the chain stays.  This is with a 23c tire and its sufficient but my Vittoria 25c's tighten that gap up a bit more, they work but I was hoping to have a bit more room.  Like I said previously, I'm not too excited about the chain stay selection at the moment but I'm looking at options.

Bob finally got over his Bronchitis and machined the bottom bracket shell for me.  The cutouts are almost 1" in diameter so there is plenty of room to push all the Di2 wiring  up into the downtube.  When I first saw that the holes ran into one another I was worried about the possibility of too much material being removed and I wondered if stomping on the peddles could actually bend this bottom bracket.  I doubt it seriously as this shell is a pretty solid piece of steel and there is less than 1/3 of the circumference missing, not to mention that this whole area is gonna be wrapped with a handful of layers of laminate, however it did cross my mind. I guess we'll find out.

I didn't have a brake bridge planned out yet so I just kinda threw this idea together real quick.  Its just a piece of thin steel tubing with a couple layers of carbon that should be sufficient to hold the caliper.  I plan on improving this on the next frame but this should work for testing purposes. Once I get this bonded in then I can start to build up the fillets in all the junctures and I enjoy making fillets so I'm looking forward to that part.  Thanks for stopping by.

Saturday, November 16, 2013

Time Factory Tour


This is an interesting little video of the Time bicycle factory.  They are probably my favorite frame brand these days.  I used to be a fan of Look however over the last couple of years I've been liking the Time style much more than Look.  I prefer straight tubes and I'm not into all those curves and arches everyone is putting into their frames.  The shortest distance between two points is a straight line and that equals less weight.  As you'll see in this video, Time weaves their own carbon, it blows me away.  You can't own a bicycle frame making process more than that.  Thats like milking a cow for your bowl of cereal in the morning.  Hope you enjoy it.

 If you have a little extra time you can check out this more in depth video.

http://www.youtube.com/watch?v=N8oTbr0cHFM

Friday, November 15, 2013

Carbon Update

I'm making progress on the carbon build albeit slow but sure.  Everything is cut and fit and basically ready to tack however I recently decided to make this a Di2 compatible frame because I've had a little interest from customers in the past and I thought it was about time to become a little familiar with it.  Truthfully electronic shifting has never interested me.  I am all certain that its dialed in and thats its probably more precise than the mechanical shifting but I'm fine with my Campy cable shifting.  Its bulletproof, easy to fix should something happen, and I don't ever have to worry about a dead battery.  I do believe that you can get quite a few shifts in before having to recharge but its just one less thing I have to worry about keeping up.  When I get ready to go ride the last thing I want to find out is that the battery on my bicycle is dead, thats a car owner's problem, but since I'm in the business of building bicycle frames for people the way that they want them, I want to be able to offer it to them.  I think I'm gonna build this frame to accommodate cable shifting as well because my main concern is getting the frames solid and looking good and I need to be able to ride it in order to be confident in it.  The hardest part about making this frame Di2 compatible is that I don't have the groupset in hand and I'm trying to figure everything out without being able to check it.  "Hey Dimitri, I've got an idea.  Why don't you go buy the groupset and then you can build the frame around it?"  Thats a fair enough question and its crossed my mind more than once but I really don't feel like spending upwards of $2000 on a group that I don't even want.  I've got better things to spend that money on.  Lets see, I need a new heater (its on the way), I need some new wheels (I've never needed new wheels this bad before), and I want/need a mill drill.  Two grand won't cover all that but it'll get alot of it, and its all for a better frame building environment.  Don't get me wrong, I would love to wake up in the morning and go grab my bike for a ride and have a brand new Campy Super Record EPS setup to test out just for kicks but its not gonna happen right now.  Thats when it would be nice to be a pro bike rider. Just show up in Mallorca, Spain for training camp and they hand you a state of the art bike to go thrash around on.  I'd bring it back in 6 pieces and say, "Nope, get me another, and I'll take a cappucino and a box of Little Debbie Swiss Cake Rolls while you're at it, and the box better not be opened this time you cunt."  Just kidding.  Thats my Bradley Wiggins immitation. He cracks me up. Whats a bloke? What was i talking about?  Who cares?  I wouldn't waste my time reading this crap, I would just be looking at the pictures, like a swanky magazine. I hope my mother doesn't read this blog. She doesn't, she doesn't own a computer.  A few months ago she bought an i-Pad with a 30-day free trial and was gonna try to get up to speed with the rest of the world.  She had that thing so screwed that it made me feel like a genius.  The computer guys didn't even know what she did to it.  After my mother started fiddling with that iPad the stock market went down over 700 points.  That whole deal with Syria that looked to be getting out of control, my mother and that iPad are responsible.  You know that remote control space car that recently crashed on Mars, yep, my mother.  She did manage to get some insurance through Obamacare, but I don't think she was trying to.  Thats just a joke, not politically motivated in any way.  I'm telling you man, my whole family is dangerous with electronics.  My dad invented and pattened two products, started his own companies, built houses, and accomplished many other things in life to be respected however he had to call a friend in order to get our VCR hooked up.  Electronics are like Satan to the Harris family.  I just got an iPhone the other day and now I'm having trouble with my rear derailleur not shifting properly.  My mother took the iPad back to the store and it was like 3 weeks after the  30-day free trial and they still gave her money back.  Guess they figured they would be helping the whole world. The day after, stocks jumped 200 points and that whole Syria thing dissolved like an Alka-Seltzer.  I'm not sure what happened to that $8 million dollar remote control car on Mars, that project was doomed from the beginning.  I imagine that the Martian people are playing hockey with it. Lets see, the moon is a bunch of white dust and Mars is a bunch of red dust.  Money well spent NASA. Where am I? Oh yeah, Di2 setup and better frame building environment.  Probably what i'll end up doing is just getting the wiring setup and junction boxes needed and use that to mock up the frame.  Its also important to say that I've talked to several friends and bike shops that have been extremely helpful in helping me get this dialed in.  "I get by with a little help from my friends....".  Thanks guys!

This is my semi-custom head tube that I made.  You saw it in an earlier post.  I'm still waiting on my tapered mandrel to get finished.  My buddy, Bob the machinist, has had bronchitis and the doctor told him to take it easy for a few days.  While I'm really anxious to get the mandrel and test it out Bob's health is a much more important issue so I'll just sit tight.

These are clearly just tube miters and really no different than the steel tube miters but I take a lot of pride in getting things as tight as possible.

This photo is so blurry I shouldn't have used it.

I'm trying to build my own rear stays to test out so that I'm not just purchasing the same rear end as everyone else.  These chainstays came from Rock West Composites and while they're ok I'm not totally stoked about them.  They seem strong enough and they are tapered but the totally round thing isn't leaving much space for tires or chainring clearance. If I'm lucky enough to pull off making a good head tube then my next adventure will be to have some type of mandrel made for chainstays, we'll see, I may be dreaming but thats what I do best.  While I'm dreaming I might as well dream for a rectangle chainstay that tapers down to a round connection at the dropouts.  Will that work?  I'm thinking yes so long as the round part is smaller than the rectangle.  It should come out, why wouldn't it?

These seatstays are just a straight O.D. without a taper but I like them.  They're skinny and remind me a little of the seat stays that I've seen on some Cervelos and Cannondales.  Apparently beefy chainstays and skinny seatstays is the way to go.  Is chainstay/seatstay one word or two?  I know that I've spelled it both ways, I'm going with one from now on until I learn otherwise.

You can see that a little fray occurred here from cutting this tube and uni-directional is notorious for that.  I have even been wrapping the ends with masking tape and it sometimes still frays.  Its not much and it will all be covered in epoxy and carbon so no worries but I'm not a big fan of uni, I don't care what they say about the stiffness.  I like the woven tubes and this seat tube seems especially nice, very user friendly and it seems just as stiff, besides, I don't feel that a little compliance is a bad thing in a bike frame.  I think everyone is blowing that whole stiffness thing out of proportion.  Granted, I don't want to ride a wet noodle but i don't care to bounce around on a jackhammer like Wile E. Coyote either. This juncture here is gonna need a nice sized epoxy fillet built up.


This is my favorite photo in quite some time.  Everything is as tight and in place as it should be.  I think I just like the seat tube.

I'm probably the first builder to use Henry James dropouts on a custom carbon frame.  What can I say?  They were in the toolbox and they seemed to fit the bill.  I'm not too concerned about the dropout situation on this frame as I'll get that worked out in time.  These are stainless and a bit heavy however I like the fact that they are not overly large and I'm not sure that they're any heavier than the dropout setup shown below on this Dedacciai rear end.  When you take the weight of the dropouts and the plugs that are bonded into the stays I can't imagine there is much of a  difference.  We'll work on this in the future.  The O.D. of the tubes was a bit larger than the dropouts but not enough to worry about.

Replaceable dropouts are a definite plus though.  I'm fixing to go visit Paragon's website.

Hard to believe this is a 58, actually a 57.5 cm frame.  This is built roughly off the same geometry as my old Scott CR1.  It was a good race bike but a bit on the stiff side for everyday riding.  Nothing like riding a 2 x 10 plank for a hundred miles. I'm thinking this frame is gonna be alright.  I left the chainstays a bit longer in case you want to run a 28c tire. The curiosity is building with this frame but I still have a long way to go.

Dizzy spent some time out in the shop with me as usual.  He's turning into a pretty good dog. He's a lot like a wild horse that will occasionally listen to you.  He loves chasing deer and eating spaghetti.  We love him to death along with the rest of our animals.  Thanks for stopping by.

Thursday, November 14, 2013

New Bike Products from WD-40

I heard about these a year or so ago but I just now have seen some pics compliments of Velonews.  I basically just needed something to post. That Big Stick post was looking old to me, although I have used the Big Sticks quite a lot on this frame and I'm still amazed at how well they work.   I originally thought they would make a good product for sale, but then I thought that they were so easy to make why would anyone bother buying them. I should have some pics of the carbon frame I'm working on here shortly.  Bare with me.

Thursday, November 7, 2013

Hey Baby, want a Big Stick?

carbon fiber files 

I'm sorry, I just had to say it.  Ever see the Cheech and Chong movie Nice Dreams where they're selling pot out of an ice cream truck and Cheech says, "Hey baby, want a big stick?"  Oh well, you didn't think you could come into this room and not hear at least one dumb joke did you?  Dumb jokes are the only ones I know.  Check out these Big Sticks that I made today.  Please note that these are for carbon fiber frame building and not smoking.


Marijuana seems to be in the headlines a lot these days.  Medical marijuana, recreational marijuana, foods and drinks with marijuana already in them.  Today I saw a marijuana business convention on MSNBC.  I've never seen so many stoners dressed up in my life. It looks like about half of the U.S. is ready to legalize pot and I'm sure the other half will follow suit.  The taxes they are collecting on it are between 25-50%.  Thats great revenue if they'll spend the money wisely and not stick it in their own pockets but when has that ever happened.  "Change is what this country needs I tell you, change."  Sometimes the world looks like its going to pot but then again I'm not sure that it hasn't been like this forever and that we only think its getting worse because we're getting older.  I remember when I was a kid my dad was always saying that the world was getting worse and talking about what we needed to do to get back on track.  I thought the world was fine.  I got up and went to school, played football with my friends at recess, came home, rode my bike and played more football with my friends (remember 'smear the queer'?  We're not supposed to say that anymore I don't think.  The queer of course was the guy with the ball).  The world seemed fine to me then and I imagine it seems ok to the kids these days.  A few years ago I went back to school to finish up my degree.  I had to take several classes that I didn't really want to take but thats part of it right?  "Communications?  Why would I need that?"  When I found out we were gonna have to give speeches in front of an audience (just a classroom) I about quit school again.  I stuck it out and got over my fear of speaking in front of a class so I was glad that I stayed with it.  Another class I had to take was European History.  "European History?", I could barely stay awake through American History.  Occasionally I would stick Playboy pictures inside the pages of my history book in middle school to help pass the time when I wasn't able to sleep. 

"Mr. Harris, have you listened to a word that I've said?"

"Of course Miss December, I mean Mrs. Johnson, I've  heard it all."

"Then why don't you repeat it for me and the rest of the class?"

" Umm, well, you said that George Jefferson discovered the Statue of Liberty in 1492."

"Mr. Harris why don't you bring your book up here and show me what page you're on."

"Umm, I don't think thats a very good idea Miss Bush, umm, I mean Mrs. Johnson.  How bout if I just go straight to the office and get a whipping instead? Please."

Anyway, the point I was trying to make was that one day in class, reading my European History book, I realized that the United States was going through the same exact problems that Europe was going through 200 years ago.  It was almost identical.  Just saying, if they haven't figured it out by now I doubt they're gonna, maybe its actually the way its supposed to be.  Of course the professor had to tell everyone that I was all wrong but that was only because the students were starting to listen to me instead of him.  I still think I was right, afterall I got all A's in every class except for his, he gave me a B.  What a tool. Just kidding.  He was a pretty cool guy actually, I forgot his name though. I think it was something like Miss Bush or Mrs. Johnson.

Alright, alright, lets get this blog post back on track.  "Big Stick?"  Ever tried to file a carbon fiber tube with a metal file?  Well I have. I built my first carbon frame using nothing but metal files and they don't work worth a flip, not to mention they dull the file in no time.  Also I didn't have all the correct diameters of hole saws that I needed to work on these sized tubes.  Lots of guys have milling machines that do this work for them but I looked around my shop for the milling machine and it wasn't there.  What to do?  This was my solution.  I went to Lowes and bought dowel rods in the diameters that I needed, mainly 1 3/8" and 
1 1/2".  I also needed a 1 3/4" for the head tube but they didn't have a dowel in that size so I managed to find a piece of PVC pipe that was the correct O.D.  Then I bought this package of 40 grit sanding belts (5 for like $5) and some velcro strips.  Actually the first two that I made I just tacked the sanding belt to the rod and then I glued the other to the PVC.  I was experimenting for the best way to do this.  

The velcro idea came later while I was thinking of a way to make the sandpaper replaceable, however tacking or gluing it directly to the rod seemed to make the best tool and should the sanding cloth wear out these things are super-simple to make, cheap too.  It was more like an actual file.  The file with velcro worked alright however it made like a cushion between the sandpaper and the dowel and it also increased the outside diameter quite a bit.  Anyway, Wallah!  I now have a set of carbon fiber files.  I cannot believe how simple and effective these things are.  I don't think I've ever made anything that worked better than I actually thought it would.  Normally I get way over excited about something and it doesn't work.  Finally, success!  They chew through a carbon tube like a beaver goes through a pine tree. "Did I really just say that?  Do beavers even eat pine trees?'  Yes I did, and I have no idea if beavers like pine trees or not.  Maybe if you put some sap on it.  I bet I can miter a carbon tube with one of these homemade files faster than you can set up your mill and get it done.  And even if I can't who cares, I don't rush my frame builds and these carbon files go as fast as I need to go. 

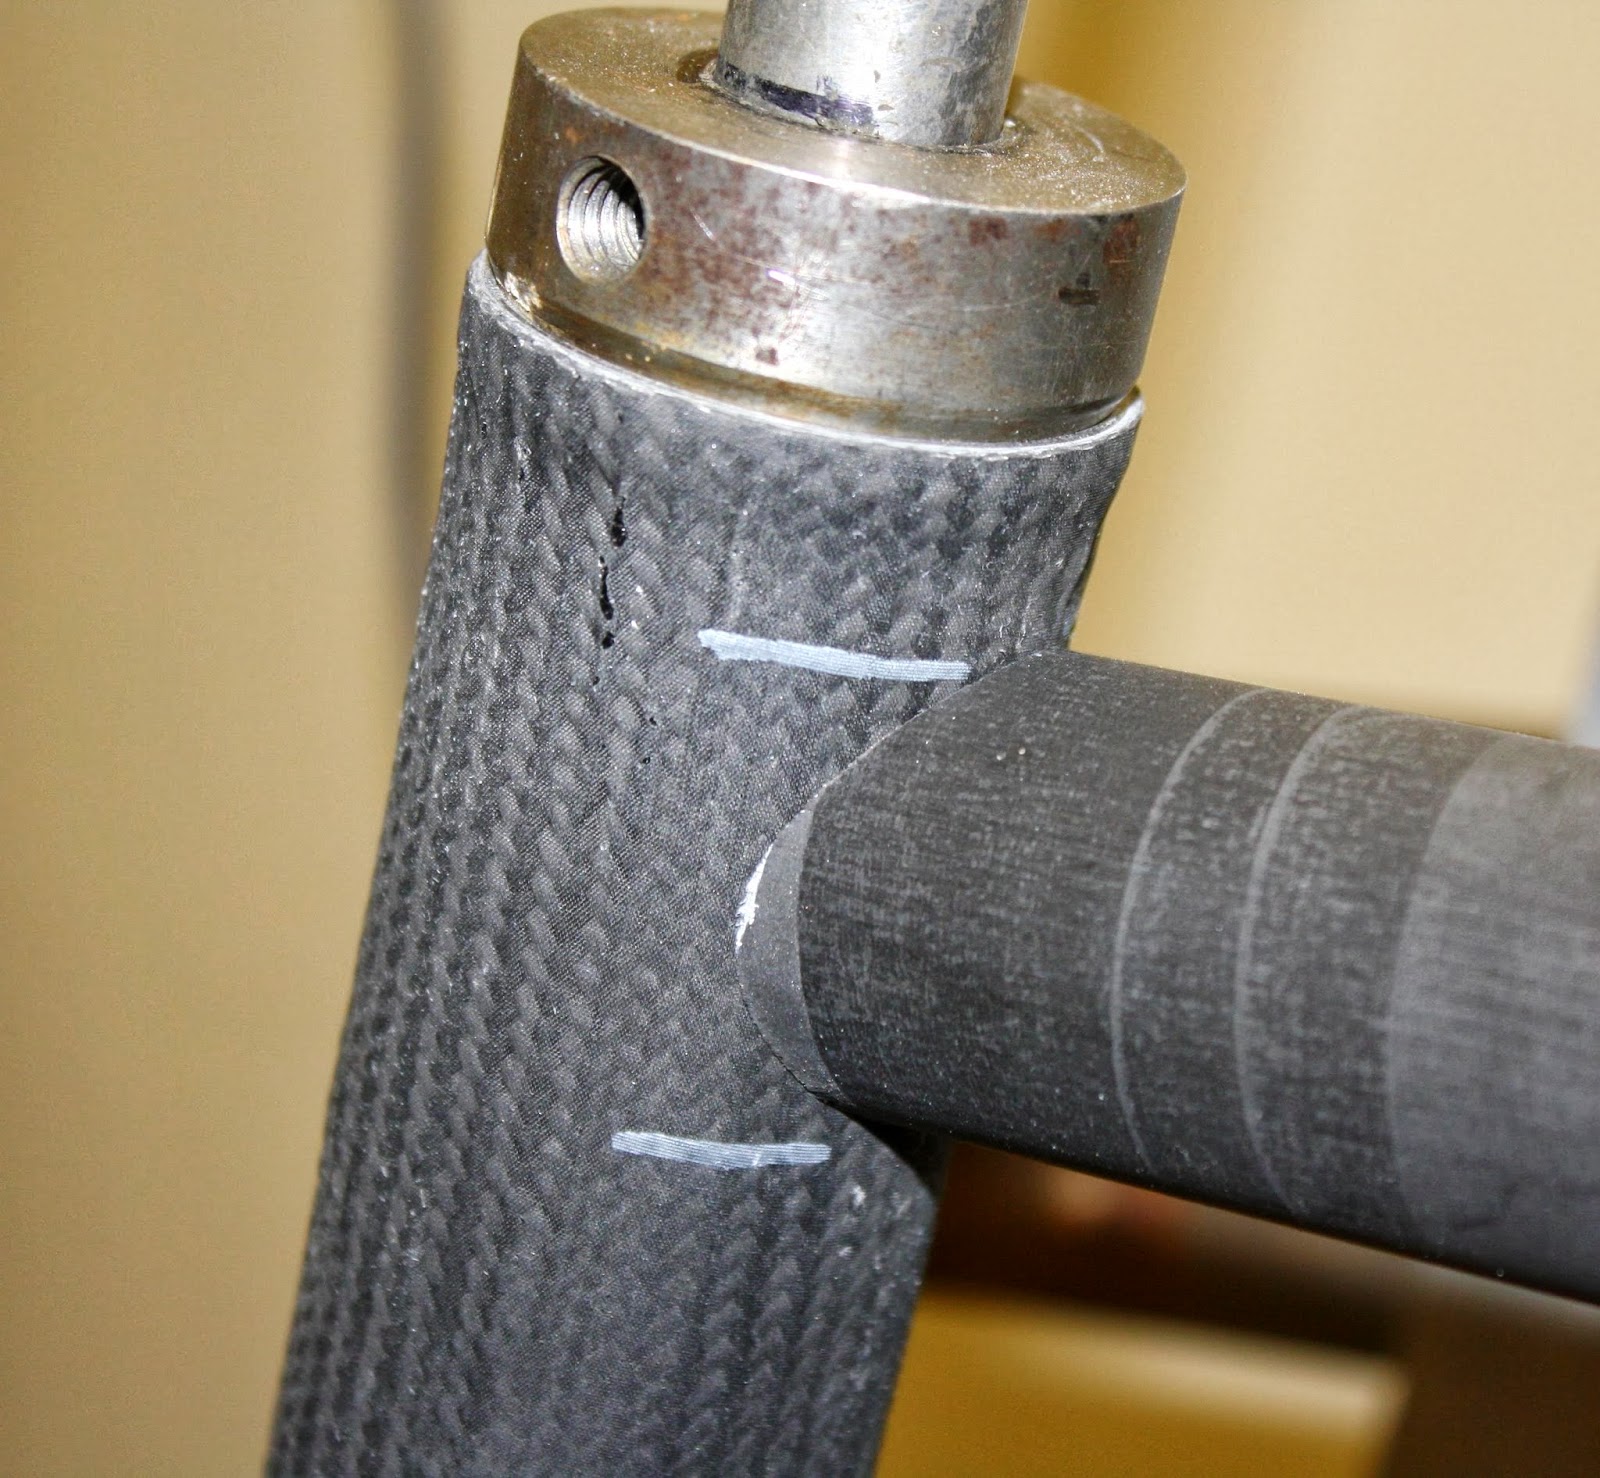
"Yeah Dimitri, but how tough are they?"  Well chief, just for fun I decided to use one on this here steel tube and while it wasn't ideal for steel it did cut into it fairly well.  Ok, the Nicholson file company doesn't have to worry about going out of business any time soon but if you want to cut through a carbon tube I would definitely buy the MEECH "BIG STICK", or, you can just make your own. You can make them for whatever diameter you may need. If you need one for an uncommon diameter the worse case scenario is to take a larger dowel and have someone turn it down to the correct O.D.  The coolest thing about BIG STICKS is that they keep your handmade frame...well, handmade.

Here are the carbon chain stays I got in yesterday from Rock West Composites.  They're pretty beefy and should work good for road bikes but I'm gonna have to figure something else out for cross frames because I'm not sure I can get the tire clearance I need out of these ones.  Give me a minute I'll figure something out.

The main frame is cut and fit and I'm gonna start on the rear end tomorrow.  Catch you later.